Saturday 29 October 2016

Super Busy Week

I have been so busy this week,
between viewing houses and creating projects for design team work
and on top of that doing commission work and my swap commitments for scrimpys, I literally have not had time to scratch my bum ;)

So phew this weekend Jayden is staying with his nana & papa, Aunty Lala (Laura) and Mirin
Laura took Jayden and Mirin to the scottish wrestling event in Paisley last night, Laura was a huge fan of the wrestling wwe so she has passed on her love to the kids over the years and Jayden absolutely loves it so she takes him with her when she goes now.


Some photos at their wrestling events over the years dont ask me who the wrestlers are as I dont have a clue haha x 

But so glad my sister enjoys stuff like that and can happily take Jayden with her to allow him these experiences.

Today Jordan is going to work with his dad, one of his clients is having a halloween party tonight and has a lot of guests coming and wants the garden and back garden spotless so with Ian's time so restricted he had to get extra help and he dragged Jordan in to it, so fingers crossed they both get home alive and dont kill one another.

I meanwhile have a project in production that I want to get finished today I also have 2 swaps for scrimpys I need to complete and get done incase anyone lets us down and cant commit to sending we dont want anyone left out so I am backup ;) have a lot done but still a few more to complete that I need to do today and tomorrow.

My Guest Design Team Kit from 
Xanderous Crafty Stash arrived and I have completed my main project
(but cant share it with you all until the 4th November)
Video is up scheduled on my youtube channel for that date and I have a canvas/wall hanging in production to decorate today also as part of that but hope to film some of the process for you all.

But heres a look at my kit and a link to Naomi's store Xanderous Crafty Stash


I have also been working on some of the swaps for Scrimpys


A mix of paper embellishments, fabric tags, altered pegs and 3x3 notecard set and box.
Phew lol x 

Anyway hope you all have a fab week and keep your eyes peeled for more projects.

Love and hugs always Karen x 
Happy Crafting xxx


Monday 24 October 2016

Card Feast

Many of you know that come this time of year I start preparing for my santa letters,
so being prepared is a huge part of that as for 2/3 weeks I get stuck on the PC typing and editing letters to make sure they are perfect before printing.
So to be ahead in my other commitments is a priority and that includes my Youtube Video tutorials,
I do a monday Card making series that I absolutely love as it gives novice card makers the ability to watch step by step how to achieve completely do able cards from start to finish.
So the past few days I have been hammering through them to get ahead and for now I am scheduled up till the 7th November and ideally by the end of the week I want sorted until new year so I know that everything is dealt with.

So here is a sneak preview of some of the upcoming tutorials on my channel
Basic Die cut and Negative card super simple and elegant x

Such a fun card to make and would be an easy one for kids and childrens groups to make in larger groups.

This is the Wow factor of the top card the sentiment has been glittered and looks fab x

Exact same as above just different colour


Lastly my bonus Halloween tutorial :) So cute x 

Along with these I have also made a gorgeous little paper bow embellishment
These were made using a Dovecraft die
which I have the link below


This link above gives me a small percentage per sale, it doesnt cost you the buyer a penny more but gives me a small amount to help buy more items to show you all what they can do.

Watch out for so many more short but helpful tutorials.

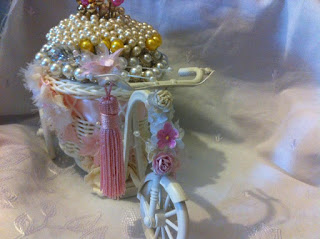
I also this weekend had some creative time to myself and decorated a bicycle Kit I bought from Scrimpys Lace Closet
it was super cute before I started to decorate so didnt overdo it, I just added a small amount of decoration to shabby it up x 


I absolutely love the outcome and the actual amount of pins it holds is a massive plus for me :)
I do LOVE my stick pins x 

Anyway I am waiting on DT Packages to arrive from 
Which I am SUPER excited about, it also is including an item from Fernli Designs,
which is known for its amazing quality and even better pricing.

Personal note Yesterday was a lost day my hip was totally out of action even laying in bed I was in pain which was not amusing, so I was on strong pain relief to help alleviate it, sadly it took the edge of the pain but not much more, I was reading my ebook, Patricia Cornwell Scarpetta Series (I love this series) I am rereading them and started book 8 yesterday Unnatural Exposure
So between reading I was watching youtube videos and started watching the series Cold Justice it is an american Lawyer and CSI (both female) helping with cold cases to try and bring forward charges.
it is really good so am on Season 2 Episode 3 of that (I know such a geek)

Anyhoo talked the hind legs of you probably but I hope you stop by my youtube channel the link is on the right handside and watch some of my tutorials x 

Sending huge crafty hugs Karen xx


Thursday 20 October 2016

Halloween Crafts

I apologise for my last blog if it upset anyone but sadly this is my reality sometimes.
I am glad to say it has pasted for now, I am still low but not feeling as vulnerable as I was last weekend.

So what have I been doing?
I went on Saturday Evening to collect Jayden from my mums with Ian and sat for 10 mins, then we went to visit Ians Sister Heather she was babysitting Baby Freddie doing her nana duties so got a wee hold of him he is just the most precious little thing ever, just gorgeous.

I then came home and done a wee bit of crafting and started on my halloween boxes as I got a commission order for 30 (then a further order for 10)
So have been beavering away in a production styled method, cut all my mat layers of patterned paper, scored and cut all my boxes, glued all the boxes, then added the papers.
I then done all the decorations for them colouring and glittering them all and then done all the wee sentiments. they are all still flat just need to glue the bases just before they are picked up so I saves some room in my wee craftroom otherwise I would drown in boxes lol.
but they are very cute.


This is the font I used for a lot of the cute images in the last photo
http://www.dafont.com/mtf-sweet-halloween-dings.font

I have also been working on embellishments for my loaded envelope but... because it will eventually be sent to someone I can't share the pieces with you and perhaps spoil the surprise.
So need to keep it under wraps.

I also got my latest Stampin Up Haul but with the exception of the wink of Stella pen I havent had time to play with them yet but watch this space x 

Also wanted to announce that I am a Guest Designer for November for Xanderous Crafty Stash
fab little facebook store with lots of little embellishments for your projects cannot wait to share their goodies with you all.

Anyway until next time happy crafting xxx


Saturday 15 October 2016

4am Reality Check - Depression

This is my life some nights,
Most nights I can go to bed at a decent time and sleep until about now usually 4/5am I wake up and come in my craftroom and watch some videos on youtube or watch some programmes on Sky Go.
But some nights I can be just so anxious that closing my eyes actually scares me, so I read a book or play games on my phone, or just lie and stare at the ceiling.
But nights like tonight happen sometimes too where I literally cannot lie down, my brain is literally pounding with so much activity and just thoughts I dont want to have.
Having depression isnt always about wanting to die, it is just about trying to live with minimal pain.
some nights thats just not possible, and at 4am when you have a hubby/partner who works damn hard around the clock to provide for us and a 17yr old with enough worries of his own (who I also believe suffers from mental health problems despite his reluctance to actually be assessed properly) and a carefree and bubbly little man who tries his hardest each and every day to just be the cutie he is, who do you turn to???? No one you sit and cry, go to the bathroom and turn on the taps so that no-one can hear you sobbing (I hate crying infront of anyone) well tonight is one of the latter nights.
I just feel so bloody useless, and I know there are folk out there much worse than me, I know that and I feel for them I really do and this isnt about sympathy or a pity party (cause really I dont cope well with that I will just say aw it was a bad night I am fine now I have slept) I just want people to realise how hard it is living with depression and anxiety it is literally an absolute head feck (sorry for my language but the only way to describe it) 
I have been so active today with producing stuff yet the minute the head went on the pillow the brain starts....
"oh you need to go to Paisley tomorrow"
"You are visiting your parents tomorrow"
"you are visiting Ians sister and the baby tomorrow, my nieces little baby freddie"
"Ian will get annoyed if I back out"
" he made the arrangements to suit me"
"could I be ill tomorrow? a migraine? upset tummy?"
"he cant be annoyed if I am sick"
"why is going to Paisley so bad?"
"dont you want to see your great nephew?"
"what a crap daughter, sister, aunt, sister in law, mother, partner, friend you really are"
"would it really matter if you werent here?"
"Their life would be much easier" 
But then I know
my kids need me, no matter how bad things get, Jayden especially needs his mum, and cannot be without me especially for the fact Ian isnt the best for emotional stuff like hugs and kisses and little kids still need that, even boys.

I honestly wish that somewhere somehow someone would come up with a cure for depression and anxiety and try work out why it happens, I had such a different like back before the kids were born,
and no I dont regret my kids I 100% adore my boys but the kids births triggered PND which I then pushed aside and refused to admit so it went untreated for so long and festered into what it is today.

Anyway I am going to go and take an extra tablet to try and knock me out and at least stop the brain for a little bit and allow my body to rest, which is massively important as having sleepless nights causes my pain levels to escalate through the day which then pulls my mood lower when I am sore.

So please if you know someone with mental health be AWARE
dont tip toe around them you cant heal them but being empathetic and supportive is a huge difference.

And yes I know all too well that depression plays tricks on your thoughts and makes you think people think the worst of you, but usually it is not true it is just the illness.

Big hugs x Karen x


Friday 14 October 2016

Loaded Envelope Base A4 Cardstock Tutorial

As Promised I am going to show you step by step how to achieve making a base for a loaded envelope using A4 cardstock to make the envelope much more durable and substantially more hardy to wear and tear.

Firstly we need 3 sheets of A4 cardstock I use 280GSM but anything over 200GSM will work well.
Also need 2 strips of A4 Card to make thin banners to support our side panels.

Firstly cut all 3 sheets of cardstock down to 8" by 11.5"
2 of these are identically cut and scored to make our front and back section of our envelope
the last one will be come our two pockets.

So with the 8" along the top of your score board I need you to score at 0.5" - 1" - 7" - 7.5"


Then turn your cardstock 90 degrees so the 11.5" is along the top of the score board
We are then scoring at 10.5" - 11"


Then do exactly the same on your second sheet of card stock and place them to the side.

for our 3rd sheet we are scoring the pockets 
Again with the 8"along the top of our score board we are scoring at
0.5" - 1" - 7" - 7.5"


Then turn your cardstock 90 degrees so the 11.5" is along the top of the score board
We are now scoring at
4" - 4.5" - 5" (this is actually going to be a cut line further on) - 5.5" - 6"


All scoring now done we can move the score board out the way.

Cutting is minimal
We are cutting the 4 small scored squares at the bottom of our front and back panels on both sides


on our pockets sheet we are cutting along the 5" score line ( this will then give us 2 pockets )


I then chose to miter all my outer score lines so they all folded in neatly

Lastly we need our two thin banners that will help support our sides
These are 3/4" x 11.5" and we score them both at 3/8"
and one thin banner measuring 3/4" x 6" and score at 3/8"


Then fold and burnish all your score lines 

Fold the 2nd line into the center


Then fold the first line back on top of it


and you should have a fold like this


do that to all score lines including our pockets

the side banners we are simply scoring down the middle


then we start to stick them all together

Get your thin banners and add your adhesive I prefer wet glue for this I use my Anita's Tacky Glue as it gives me time to make sure all my sides are properly stuck down where I want them otherwise double sided tape although faster can be a disaster and cost you more time by having to start all over again.
So add glue to your banner on the sides that will fold around your envelope

like above and do that on all 3 sides (the smallest one obviously the bottom dont worry about the sides not being folded in right now once it is all stuck together as long as the score lines have been burnished it will fold back in easily)

I then covered the base envelope with my chosen paper line (it is easiest to do than now so the inside of the pockets will also be seen and if it is covered prior to the pockets stuck down it will just look prettier)
You paper need to be cut at 10.5" x 6" and you need 2 of those (one for the back and one for the front) dont throw away the extra bits (I used them as decoration)

For the pockets one pocket is 4" x 6"
and the other I placed the 5 and 3/4" (this is a slither to big but you can trim that x 6")
What I did was took a 12" x 6" chopped it down to 4" x 6" for one pocket then the remainer I stuck on the larger pocket and just trimmed it down was easier than measuring.

Once you have covered the envelope you can stick on your pockets just add adhesive to the gusset and stick it on to your envelope I used both my pockets at the bottom of my envelope so they are easier to line up but this is completely optional where to lay them.

now is time to decorate to your heart is content in whatever style or theme you wish.

This was mine front and back


I have done 2 videos one showing the base idea and the 2nd showing how I decorated.

I hope these are helpful and give you easy step by step instructions on how to achieve this gorgeous project. if you do follow this tutorial please let me know either tag me on facebook or email me at karenmcclure@gmail.com and let me see your gorgeous work.

Love and crafty hugs Always Karen xxx